Only two remote holes in the default install, in a heck of a long time!
Goals
OpenBSD believes in strong security. Our aspiration is to be NUMBER
ONE in the industry for security (if we are not already there). Our
open software development model permits us to take a more
uncompromising view towards increased security than most vendors are
able to. We can make changes the vendors would
not make. Also, since OpenBSD is exported with
cryptography, we are able to take cryptographic approaches towards
fixing security problems.
Full Disclosure
Like many readers of the
BUGTRAQ mailing list,
we believe in full disclosure of security problems. In the
operating system arena, we were probably the first to embrace
the concept. Many vendors, even of free software, still try
to hide issues from their users.
Security information moves very fast in cracker circles. On the other
hand, our experience is that coding and releasing of proper security
fixes typically requires about an hour of work — very fast fix
turnaround is possible. Thus we think that full disclosure helps the
people who really care about security.
Audit Process
Our security auditing team typically has between six and twelve
members who continue to search for and fix new security holes. We
have been auditing since the summer of 1996. The process we follow to
increase security is simply a comprehensive file-by-file analysis of
every critical software component. We are not so much looking for
security holes, as we are looking for basic software bugs, and if
years later someone discovers the problem used to be a security
issue, and we fixed it because it was just a bug, well, all the
better. Flaws have been found in just about every area of the system.
Entire new classes of security problems have been found during our
audit, and often source code which had been audited earlier needs
re-auditing with these new flaws in mind. Code often gets audited
multiple times, and by multiple people with different auditing
skills.
Some members of our security auditing team worked for Secure Networks,
the company that made the industry's premier network security scanning
software package Ballista (Secure Networks got purchased by Network
Associates, Ballista got renamed to Cybercop Scanner, and well...)
That company did a lot of security research, and thus fit in well
with the OpenBSD stance. OpenBSD passed Ballista's tests with flying
colours since day 1.
Another facet of our security auditing process is its proactiveness.
In most cases we have found that the determination of exploitability
is not an issue. During our ongoing auditing process we find many
bugs, and endeavor to fix them even though exploitability is not
proven. We fix the bug, and we move on to find other bugs to fix. We
have fixed many simple and obvious careless programming errors in code
and only months later discovered that the problems were in fact
exploitable. (Or, more likely someone on
BUGTRAQ
would report that other operating systems were vulnerable to a newly
discovered problem, and then it would be discovered that OpenBSD had
been fixed in a previous release). In other cases we have been saved
from full exploitability of complex step-by-step attacks because we
had fixed one of the intermediate steps. An example of where we
managed such a success is the lpd advisory that Secure Networks put out.
New Technologies
As we audit source code, we often invent new ways of solving problems.
Sometimes these ideas have been used before in some random application
written somewhere, but perhaps not taken to the degree that we do.
Our proactive auditing process has really paid off. Statements like
This problem was fixed in OpenBSD about 6 months ago have become
commonplace in security forums like
BUGTRAQ.
The most intense part of our security auditing happened immediately
before the OpenBSD 2.0 release and during the 2.0→2.1 transition,
over the last third of 1996 and first half of 1997. Thousands (yes,
thousands) of security issues were fixed rapidly over this year-long
period; bugs like the standard buffer overflows, protocol
implementation weaknesses, information gathering, and filesystem
races. Hence most of the security problems that we encountered were
fixed before our 2.1 release, and then a far smaller number needed
fixing for our 2.2 release. We do not find as many problems anymore,
it is simply a case of diminishing returns. Recently the security
problems we find and fix tend to be significantly more obscure or
complicated. Still we will persist for a number of reasons:
Occasionally we find a simple problem we missed earlier. Doh!
Security is like an arms race; the best attackers will continue
to search for more complicated exploits, so we will too.
Finding and fixing subtle flaws in complicated software is
a lot of fun.
The auditing process is not over yet, and as you can see we continue
to find and fix new security flaws.
Secure by Default
To ensure that novice users of OpenBSD do not need to become security
experts overnight (a viewpoint which other vendors seem to have), we
ship the operating system in a Secure by Default mode. All non-essential
services are disabled. As the user/administrator becomes more familiar
with the system, he will discover that he has to enable daemons and other
parts of the system. During the process of learning how to enable a new
service, the novice is more likely to learn of security considerations.
This is in stark contrast to the increasing number of systems that
ship with NFS, mountd, web servers, and various other services enabled
by default, creating instantaneous security problems for their users
within minutes after their first install.
Cryptography
And of course, since the OpenBSD project is based in Canada, it is possible
for us to integrate cryptography. For more information, read the page
outlining what we have done with cryptography.
Advisories
Please refer to the links at the top of this page.
Watching our Changes
Since we take a proactive stance with security, we are continually
finding and fixing new security problems. Not all of these problems
get widely reported because (as stated earlier) many of them are not
confirmed to be exploitable; many simple bugs we fix do turn out to
have security consequences we could not predict. We do not have the
time resources to make these changes available in the above format.
Thus there are usually minor security fixes in the current source code
beyond the previous major OpenBSD release. We make a limited
guarantee that these problems are of minimal impact and unproven
exploitability. If we discover that a problem definitely matters for
security, patches will show up here VERY quickly.
People who are really concerned with security can do a number of
things:
If you understand security issues, watch our
source-changes mailing list and keep an
eye out for things which appear security related. Since
exploitability is not proven for many of the fixes we make,
do not expect the relevant commit message to say SECURITY FIX!.
If a problem is proven and serious, a patch will be available
here very shortly after.
Track our current source code tree, and teach yourself how to do a
complete system build from time to time (read /usr/src/Makefile
carefully). Users can make the assumption that the current
source tree always has stronger security than the previous release.
However, building your own system from source code is not trivial;
it is over 850MB of source code, and problems do occur as we
transition between major releases.
Install a binary snapshot for your
architecture, which are made available fairly often. For
instance, an amd64 snapshot is typically made available daily.
Reporting problems
If you find a new security problem, you can mail it to
deraadt@openbsd.org.
If you wish to PGP encode it (but please only do so if privacy is very
urgent, since it is inconvenient) use this pgp key.
Further Reading
Numerous
papers have been written by OpenBSD team members,
many dedicated to security.
Best Linux distro for privacy and security in 2020
(Image credit: Shutterstock)
Privacy and security have become increasing concerns for internet
users, not least with increased government monitoring and corporate
collection of user data, and a long string of well-publicized hack
attacked in which this user data has been stolen and mis-used.
While
Windows and macOS machines have some protections in place, and there
are additional options such as using a VPN or Tor browser, a number of
Linux distros are now available that put privacy and security at their
core.
For some of these Linux distros it's a case of building in privacy
protection by default using a variety of tools. For others, it's a
matter of including security software as standard for those who need to
do penetration testing.
Each of these distros has a different
focus on privacy and/or security according to user interests and needs.
Here we'll list the best 10 for you to consider.
Best Linux distro for privacy and security - at a glance
An extremely secure OS but for advanced users only
Risky apps are confined to separate virtual machines
Also uses sandboxing to protect system components
Can be tricky to set up and manage
While definitely not for novice users, Qubes
is one of the top privacy-conscious distros. The graphical installer
must be used to install the OS to your hard drive, which will be
encrypted.
Qubes OS uses the Xen Hypervisor to run a number of
virtual machines, compartmentalising your life into ‘personal’, ‘work’,
‘internet’ and so on for the sake of security. This means if you
accidentally download malware on your work machine for instance, your
personal files won’t be compromised.
The main desktop uses colour-coded windows to show different virtual machines, making it easy for you to tell them apart.
Tails
(which stands for ‘The Amnesiac Incognito Live System’) is probably the
most well-known privacy-focused distro. It can be run from a DVD in
Live mode whereby it loads entirely into your system RAM and will leave
no trace of its activity. The OS can also be used in ‘persistent’ mode
where your settings can be stored on an encrypted USB stick.
All
connections are routed through the anonymity network Tor, which conceals
your location. The applications in Tails have also been carefully
selected to enhance your privacy – for example, there’s the KeePassX
password manager and Paperkey, a command line tool used to export
OpenPGP secret keys to print on paper. There are also a small number of
productivity apps such as Mozilla Thunderbird and the powerful
LibreOffice suite.
You
can install more applications from Debian repositories via the command
line, but they will take some time to download as they pass through the
Tor network.
Do note that vulnerabilities are constantly
discovered with Tails so be sure to check for updates (as you should do
with any OS, of course).
Boasts a huge range of pen-testing and hacking tools
Large number of built-in hacking utilities
Constantly updated
64-bit Live ISO is over 11GB
This
pen-testing distro is based on Arch Linux, which may be good or bad
news depending on how familiar you are with its parent operating system.
While relatively new, this OS contains over 2,000 different hacking
tools, saving you the trouble of having to download what you need each
time.
The BlackArch
distro is constantly updated, with new ISO images being released on a
quarterly basis. These are very large in size (currently 14 GB) due to
the amount of pre-installed programs, but note that there's also a much
smaller Netinstall version which is only around 491 MB.
BlackArch
can be run live from a USB stick or CD, or installed onto a computer or
virtual machine. It can even be installed onto a Raspberry Pi to give
you a portable pen-testing computer that you can carry anywhere.
The
‘anti-forensics’ category is particularly worth mentioning as it
contains tools to scan your memory for passwords to encrypted devices.
This helps protect your machine from a ‘cold boot’ attack.
Named after the Hindu goddess, Kali
is one of the oldest and most well-known pen-testing Linux distros. The
Kali download page offers ISOs that are updated weekly, which can be
run in live mode or installed to a drive. Kali will also happily run on
ARM devices like the Raspberry Pi.
Kali’s reputation is so formidable that its creators offer training through the Kali Linux Dojo.
Lessons include customising your own Kali Linux ISO and learning the
fundamentals of pen-testing. For those unable to attend the training,
all educational resources from the classes are available on Kali’s
website free of charge.
Anyone interested in a career in Information Security can also take on Kali's paid penetration testing courses
which take place online and are self-paced. There's a 24-hour
certification exam which if passed will make you a qualified penetration
tester.
Stay under the radar via the anonymous I2P network
Little risk of leaking your real IP online
I2P connections generally faster than Tor
No way to access regular websites easily
IprediaOS
is a privacy-oriented operating system based on Fedora Linux and can be
run in Live mode or installed to your hard drive. Just as Tails OS
routes all your connections through the Tor network to anonymise your
connection, Ipredia routes all your network traffic through the
anonymous I2P network.
This is known as 'garlic routing',
a process whereby I2P establishes one-directional encrypted tunnels to
protect your data. This is theoretically much safer than Tor's 'onion
routing' which transmits data over established 'circuits', meaning they
can be targeted for surveillance.
Features
include anonymous email, BitTorrent client, and the ability to browse
eepsites (special domains with the extension .i2p). Unlike Tor, I2P
doesn’t act as a gateway to the normal internet, so Ipredia cannot
safely access regular websites.
The advantage of only accessing
eepsites is that your connection is truly untraceable. As I2P is
designed specifically for 'hidden' services, connection and download
speeds are generally much faster than routing through Tor as TAILS does.
Harness the power of virtual machines to stay safe online
Connections routed via the anonymous Tor network
Many privacy-specific apps preinstalled
VM performance isn’t as fast as local installation
Booting
a Live operating system is a nuisance as you have to restart your
machine, while installing it to a hard drive means there’s a risk of it
being compromised. Whonix offers an elegant compromise by being designed to work as a virtual machine inside the free program Virtualbox.
Whonix
is split into two parts. The first ‘Gateway’ routes all connections to
the Tor network for the second ‘Workstation’ part. This hugely reduces
the chance of DNS leaks which can be used to monitor what websites you
visit.
The OS has a number of privacy-conscious features. These include bundled apps such as the Tor Browser and Tox instant messenger.
As
it runs in a virtual machine, Whonix is compatible with all operating
systems that can run Virtualbox. Virtual machines can only use a portion
of your real system's resources, so Whonix will not necessarily perform
as fast as an OS that has been installed to a local hard drive.
Another distro bristling with pen-testing utilities
Visually stunning desktop and menus
Large range of pen-testing tools
Potential stability issues
This Parrot Security
distro comes to us from the Italian team Frozenbox. Like Kali and
BlackArch it categorises tools for easy access and even has a section
for the ones you most commonly use.
Parrot
is based on Debian 10 (Buster), the testing branch of this OS, so you
might encounter stability issues. However, note that Parrot has much
more colorful backgrounds and menus than its parent OS. As such, its
hardware requirements are rather more demanding than other pen-testing
distros such as Kali.
There
are four different versions available, Parrot Home, Parrot Security,
and Parrot Netinstall. The first two require a minimum of 2 GB of RAM,
while the third can run from 512 MB of RAM. However do note that Parrot
Security recommend 8 GB as best.
Our
final offering is TENS (Trusted End Node Security). Formerly known as
LPS (Lightweight Portable Security), this Linux distro has been designed
by none other than the US Air Force and is NSA approved [PDF].
The
public version of TENS is specifically designed to be run in Live mode,
meaning that any malware is removed on shutdown. It includes a minimal
set of applications but there is also a ‘Public Deluxe’ version which
comes with Adobe Reader and LibreOffice. All versions include a
customisable firewall, and it’s also worth noting that this operating
system supports logging in via Smart Card.
Everyone has a flash drive. They’re great little things, and they
make safeguarding data easy. However, sometimes flash drives can get
corrupted or just flat out quit working. If you’re a Linux user and this
has happened to you, there’s an easy fix to all of this. In this
article we’ll go over a few really simple tricks on how you can get your
flash drive back in working order. Note: the tricks outlined in this article aren’t necessarily exclusive to USB drives and can be used on hard drives too.
Removing bad blocks from the USB drive with fsck
An easy way to repair a flash drive, or any drive really, is to use the fsck
tool. This tool is great for removing bad file blocks, as most (if not
all) corruption and unreadability comes from problems like this. To
remove the corrupted file blocks from the USB flash drive, open a
terminal window and enter the following commands.
Users must figure out what the drive designation is on the system before things can move forward. Do this by entering the lsblk command. This will list all of the attached disks on your system.
lsblk
Note: the lsblk command lists all
disks, not just USB drives. Pay close attention to the output, as it is
easy to mistake a hard drive for a flash drive.
To remove the bad file block, run the fsck command on
either a specific partition (e.g. /dev/sdc1), or the entire disk (e.g.
/dev/sdc). Once completed, the USB drive will have a healthy partition
again and be fully operational on Linux.
sudo fsck /dev/sdc1
Note: this tutorial assumes that the flash drive is
/dev/sdc (or /dev/sdc1). Users may have different labels for their flash
drive on their system.
Zeroing the USB drive
Sometimes a USB drive can be totally unreadable to the point where it
is no longer worth saving. When this happens the best route is often to
just zero out the data and start over. The best tool for the job in
this situation is dd, and it works quite well.
Start by taking the drive label that was found earlier with the lsblk command, and apply the same logic (remember that /dev/sdc1 is a partition, and /dev/sdc is an entire device).
sudoddif=/dev/zero of=/dev/sdc
Making a new file system
Zeroing a USB drive (or any device for that matter) renders the data
on it totally useless. This means that you’ll need to create a new data
partition. Choose a file system, and then run the command! Fat32
sudo mkfs.msdos -f32/dev/sdc1
Ext4
sudo mkfs.ext4 -f/dev/sdc1
NTFS
sudo mkfs.ntfs -f/dev/sdc1
Conclusion
USB flash drives are useful devices. They make it easy for people to
easily transfer data from one computer to the other, regardless of the
operating system it’s running. That’s why it’s so important to know what
to do when the drive is no longer accessible. Luckily, Linux ships with
some really useful tools that make saving a flash drive quite easy. Font: MakeTechEasier
You don't need to be a Linux expert to install Mint on a Windows PC. Here's how to do it.
(Image: ZDNet)
Download Mint
First, you can -- and
should -- try Linux Mint before switching to it. Fortunately, unlike
other operating systems, Linux distros like Mint make it easy to give
them a test run before installing it.
To do this, first you'll need to download a copy of Linux Mint, which comes with three different desktops: MATE, Xfce, and its default desktop, Cinnamon. If you have a 2012-or-newer PC, I recommend you download the 64-bit version of Mint with Cinnamon and multi-media support.
Ready your tools
If you don't have an ISO burner program, download one. I recommend freeware programs ImgBurn for optical drives and Yumi for Windows for USB sticks. Other good choices are LinuxLive USB Creator and UNetbootin. These are also free programs.
Unless
you're stuck with an older PC that won't boot from a USB stick, I
strongly recommend using a USB flash drive. You can run Linux from a
DVD, but it's very slow.
At 1.5GB, the Mint download might take a while, so be ready for a wait.
Giving Mint a try
Once
you've installed the burner program and have the latest Linux Mint ISO
file in hand, use the burner to put the ISO image to your disc or USB
stick. If you're using a DVD -- Mint is too big to fit on a CD -- check
your newly burned disc for errors. Over the years, I've had more
problems with running Linux and installing Linux from DVDs from bad
discs than all other causes combined.
You can set it up a USB
stick with persistent storage. With this, you can store your programs
and files on the stick. This way you can carry Linux and use it as a
walk-around operating system for hotel, conference, and library PCs.
I've found this to be very handy and there's always at least one Linux
stick in my laptop bag.
Next, you place your disc or USB stick
into your PC and reboot. During the reboot, stop the boot-up process and
get to your PC's UEFI or BIOS settings. How you do this varies
according to the system.
Look for a message as the machine starts
up that tells which key or keys you'll need to press in order to get to
the BIOS or UEFI. Likely candidates are a function key or the "esc" or
"delete" keys. If you don't spot it the first time, don't worry about
it. Just reboot and try again.
Once
you get to the BIOS or UEFI, look for a menu choice labeled "Boot,"
"Boot Options," or "Boot Order." If you don't see anything with the word
"boot" in it, check other menu options such as "Advanced Options,"
"Advanced BIOS Features," or "Other Options." Once you find it, set the
boot order so that instead of booting from the hard drive first, you
boot from either the CD/DVD drive or from a USB drive.
Once your
PC is set to try to boot first from the alternative drive, insert your
DVD or USB stick and reboot. Then, select "Start Linux Mint" from the
first menu. And, from there, you'll be running Linux Mint.
Some
Nvidia graphics cards don't work well with Mint's open-source driver. If
Linux Mint freezes during boot, use the "nomodeset" boot option. You
set this to the Start Linux Mint option and press 'e' to modify the boot
options. Then, replace "quiet splash" with "nomodeset" and press F10 to
boot. On older PCs using BIOS, press 'tab' instead of 'e.'
Mint
will run slower this way, but it will boot and run. If you decide to
install Mint, you can permanently fix the problem with the following
steps:
Run the Driver Manager
Choose the NVIDIA drivers and wait for them to be installed
Reboot the computer
So
far, you haven't installed anything on your PC, but you will be running
Mint. Use this opportunity to play with Mint to see if you like it.
Using
a DVD drive Mint will run slowly, but it will run quickly enough to
give you an idea of what it's like to use Mint. With a USB stick, it
runs fast enough to give you a good notion of what working with Mint is
like.
Installing Linux and dealing with Secure Boot
Let's say you like what you see. Now, you're ready to install Mint.
First,
make a complete backup of your Windows system. Installing Linux in the
way I'm going to describe shouldn't hurt your Windows setup at all, but
why take any chances?
It used to be that installing Linux on Windows PCs with UEFI and Secure Boot was a major pain. It can still be an annoyance, but Ubuntu and Mint have made booting and installing with Secure Boot system a non-issue.
All pre-built binaries intended to be loaded as part of the boot
process, with the exception of the initrd image, are signed by
Canonical's UEFI certificate, which is implicitly trusted by being
embedded in the Microsoft signed shim loader.
If for some reason
you can't install Mint with Secure Boot running on your PC, you can
always turn off Secure Boot. There are many ways to switch Secure Boot off. All involve going to the UEFI control panel during the boot process and switching it off.
Starting your Linux Mint installation
Next,
make sure your PC is plugged in. The last thing you want is to run out
of battery power during an operating system install! You'll also need an
internet connection and about 8GBs of free drive space.
That
done, reboot into Linux again. Once you have the Mint display up, one of
your icon choices on the left will be to install Mint. Double-click it
and you'll be on your way.
You'll
need to walk your way through several menu choices. Most of these
decisions will be easy. For example, the language you want Mint to use
and your time zone. The one critical choice will be how to partition
your hard drive.
Enterprise Software
Partitioning a hard
drive can become very complicated, but fortunately, there's an easy
choice that will let you dual-boot both Windows and Mint. Simply pick
the first option on the Installation Type menu: "Install Linux Mint
alongside them."
This procedure will install Linux Mint next to
your existing Windows system and leave it totally untouched. When I do
this, I usually give half my PC's remaining drive space to Mint. You'll
be asked to choose which operating system you want to boot by default.
No matter which one you pick, you'll get a few seconds to switch to the
other operating system.
You'll also be required to give your
system a name; pick out a username for yourself, and come up with a
password. You can also choose to encrypt your home directory to keep
files relatively safe from prying eyes. However, an encrypted home
directory slows systems down. It's faster, albeit counterintuitive, to
encrypt the entire drive after you have Mint up and running.
Mint
19's new setup menu enables you to automatically run several processes.
These are to set up a system snapshot with Timeshift. This way, if
something goes wrong later, you can restore your system files and get
back to a working system. While you're at this, set up a regular
Timeshift schedule.
Next, you can have it check to see if your
computer needs any additional drivers. I highly recommend you run this.
After this, you can choose to install proprietary multimedia codecs
such as drivers to watch DVDs. I think you should do this, as well.
You
should also set it to update your system to the latest software. Unlike
Windows, when you update Mint, you're updating not just your operating
system but all the other programs such as the default web browser,
Firefox; office-suite, LibreOffice; and any other programs you've
installed from Mint's Software Manager
To
do this manually, click on the shield icon in the menu bar. By default
in the Cinnamon desktop, the bar will be on the bottom part of the
screen and the icon will be on the right. It will then prompt you for
your password and ask if you really want to update your system. Say yes,
and you'll be ready to give your new Mint system a real try out.
The
setup routine also offers to let you look at system settings and find
new programs with the Software Manager, but since you're probably a new
user, you can skip those for now.
That's all there is to it. I've
installed Linux hundreds of time, and it usually takes me about an hour
from starting my download -- the blessings of a 400Mbps internet
connection -- to moving from booting up to customizing my new Mint PC.
If you've never done it before, allow yourself an afternoon or morning
for the job.
Have fun, get work done, and enjoy.
You have to install the following userspace libraries:
libmnl , this library provides the interfaces to communicate kernel and userspace via Netlink. It is very likely that your distribution already provides a package for libmnl that you can use. If you decide to use your distributor package, make sure you install the development package as well.
libnftnl, this library provides the low-level API to transform netlink messages to objects.
You also need libgmp and libreadline, most
distributions already provide packages for these two libraries, so make
sure you install the development extensions of this packages to
successfully compile nftables.
If you plan to give a test to nftables, we recommend you to use git snapshots for libnftnl and nft.
Installing userspace libraries from git
To install libnftnl, to can type these magic spells:
$ git clone git://git.netfilter.org/libnftnl
$ cd libnftnl
$ sh autogen.sh
$ ./configure
$ make
$ sudo make install
If you are working behind proxy than it might possible that you are
not able to clone using git protocol so try to clone using "http/https:"
instead "git:"
Reasons:- 1) The git protocol, by default, uses the port 9418. It might possible that your traffic is blocked on that port.
2) Also take help and can relate from the solution
If you have any compilation problem, please report them to the netfilter developer mailing list providing as much detailed information as possible.
Installing userspace libraries from snapshots
You can retrieve daily snapshots of this library from the Netfilter FTP. Then, to install it you have to:
$ wget ftp://ftp.netfilter.org/pub/libnftnl/snapshot/libnftnl-20140217.tar.bz2
$ tar xvjf libnftnl-20140217.tar.bz2
$ ./configure
$ make
$ sudo make install
Installing userspace nft command line utility
This is the command line utility that provides a user interface to configure nftables.
Installing from git
Just type these commands:
% git clone git://git.netfilter.org/nftables
% cd nftables
% sh autogen.sh
% ./configure
% make
% make install
You should check that nft is installed in your system by typing:
% nft
nft: no command specified
That means nft has been correctly installed.
Installing Linux kernel with nftables support
Prerequisites: nftables is available in Linux kernels since version
3.13 but this is software under development, so we encourage you to run
the latest stable kernel.
Validating your installation
You can validate that your installation is working by checking if you can install the 'nf_tables' kernel module.
% modprobe nf_tables
Then, you can check that's actually there via lsmod:
# lsmod | grep nf_tables
nf_tables 423490
Make sure you also have loaded the family support, eg.
Other family modules are nf_tables_ipv6, nf_tables_bridge, nf_tables_arp and (since Linux kernel >= 3.14) nf_tables_inet.
These modules provide the corresponding table and the filter chain support for the given family.
You could also check which modules are supported by your current kernel. How to to do this, depends on your distro:
on debian, look in /boot/config-XXX-YYY, where XXX is your
kernel package version, and YYY is your arch, e.g.
/boot/config-4.2.0-1-amd64
on Arch, look in /proc/config.gz. As this is compressed, use a command such as zcat or zgrep.
In the debian example below, CONFIG_NFT_REDIR_IPV4 and CONFIG_NFT_REDIR_IPV6 are not set, so you can't use redirect in the ruleset:
% grep CONFIG_NFT_ /boot/config-4.2.0-1-amd64
CONFIG_NFT_EXTHDR=m
CONFIG_NFT_META=m
CONFIG_NFT_CT=m
CONFIG_NFT_RBTREE=m
CONFIG_NFT_HASH=m
CONFIG_NFT_COUNTER=m
CONFIG_NFT_LOG=m
CONFIG_NFT_LIMIT=m
CONFIG_NFT_MASQ=m
CONFIG_NFT_REDIR=m
CONFIG_NFT_NAT=m
CONFIG_NFT_QUEUE=m
CONFIG_NFT_REJECT=m
CONFIG_NFT_REJECT_INET=m
CONFIG_NFT_COMPAT=m
CONFIG_NFT_CHAIN_ROUTE_IPV4=m
CONFIG_NFT_REJECT_IPV4=m
CONFIG_NFT_CHAIN_NAT_IPV4=m
CONFIG_NFT_MASQ_IPV4=m
# CONFIG_NFT_REDIR_IPV4 is not setCONFIG_NFT_CHAIN_ROUTE_IPV6=m
CONFIG_NFT_REJECT_IPV6=m
CONFIG_NFT_CHAIN_NAT_IPV6=m
CONFIG_NFT_MASQ_IPV6=m
# CONFIG_NFT_REDIR_IPV6 is not setCONFIG_NFT_BRIDGE_META=m
CONFIG_NFT_BRIDGE_REJECT=m
Installing from git
This is slower as you will retrieve the Linux kernel git tree for nftables:
After retrieving the git tree, you have to follow the same steps that described in the installation from sources.
But you will get the most recent changes for the nftables kernel code there.
When configuring the kernel, be sure to enable all the nftables modules (choose 'm' or 'y'). This is an example:
$ make oldconfig
Netfilter Xtables support (required for ip_tables)(NETFILTER_XTABLES)[M/y/?] m
Netfilter nf_tables support (NF_TABLES)[N/m](NEW) m
Netfilter nf_tables payload module (NFT_PAYLOAD)[N/m](NEW) m
Netfilter nf_tables IPv6 exthdr module (NFT_EXTHDR)[N/m](NEW) m
Netfilter nf_tables meta module (NFT_META)[N/m](NEW) m
Netfilter nf_tables conntrack module (NFT_CT)[N/m](NEW) m
Netfilter nf_tables rbtree set module (NFT_RBTREE)[N/m](NEW) m
Netfilter nf_tables hashset module (NFT_HASH)[N/m](NEW) m
Netfilter nf_tables counter module (NFT_COUNTER)[N/m](NEW) m
Netfilter nf_tables log module (NFT_LOG)[N/m](NEW) m
Netfilter nf_tables limit module (NFT_LIMIT)[N/m](NEW) m
Netfilter nf_tables nat module (NFT_NAT)[N/m](NEW) m
Netfilter x_tables over nf_tables module (NFT_COMPAT)[N/m/?](NEW) m
IPv4 nf_tables support (NF_TABLES_IPV4)[N/m](NEW) m
nf_tables IPv4 reject support (NFT_REJECT_IPV4)[N/m](NEW) m
IPv4 nf_tables route chain support (NFT_CHAIN_ROUTE_IPV4)[N/m](NEW) m
IPv4 nf_tables nat chain support (NFT_CHAIN_NAT_IPV4)[N/m](NEW) m
IPv6 nf_tables support (NF_TABLES_IPV6)[M/n] m
IPv6 nf_tables route chain support (NFT_CHAIN_ROUTE_IPV6)[M/n] m
IPv6 nf_tables nat chain support (NFT_CHAIN_NAT_IPV6)[M/n] m
Ethernet Bridge nf_tables support (NF_TABLES_BRIDGE)[N/m/y](NEW) m
After updating your machine Now KeePass repository is available . Run the following command to Install KeePass.
ubuntu@ubuntu:~$ sudoapt-get install keepass2 -y
Now to check which version of KeyPass is installed run the following command
ubuntu@ubuntu:~$ keepass --version
If the above command gives you the version of Keepass ,it means the
installation has been successful. Or you can search KeePass in
applications.
How to use KeePass2
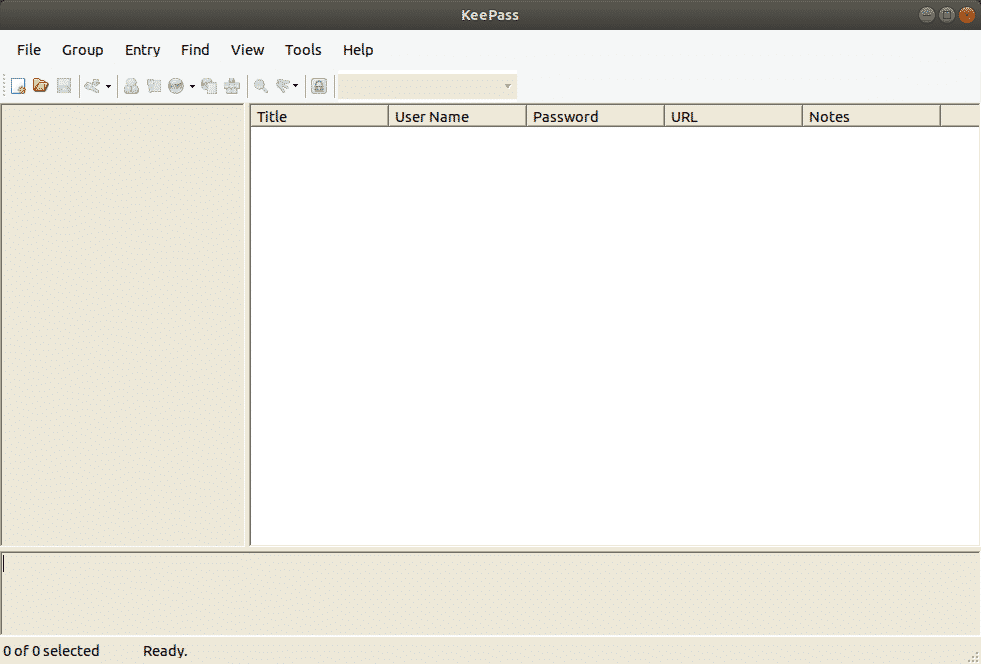
Here is how main Screen of KeePass looks like:
First, you need to make a database with your passwords. Set your
master password carefully because if you lose this password, you lose
all of your passwords
Create a new database and set master Password by clicking on New on Top Left Corner .
Setting the Database Password
What stands between the Hacker trying to get into your password
database and your password database is the Password you give to your
KeePass database. To make it strong, you should make it as complicated
as possible by using special characters ,Punctuation and numbers. As
soon as you start typing Password ,the yellow line will tell you
Keepass’ opinion of your decision.The higher it goes,the better.
Here you go,Now you have a database and you can start generating
passwords. On the left side ,there are login categories. These are
categories that come by default in KeePass, which can be deleted or
edited.New ones can be made as many as one wants to. Two default entries
are also present which can be deleted or renamed easily.
Generating Your First Password
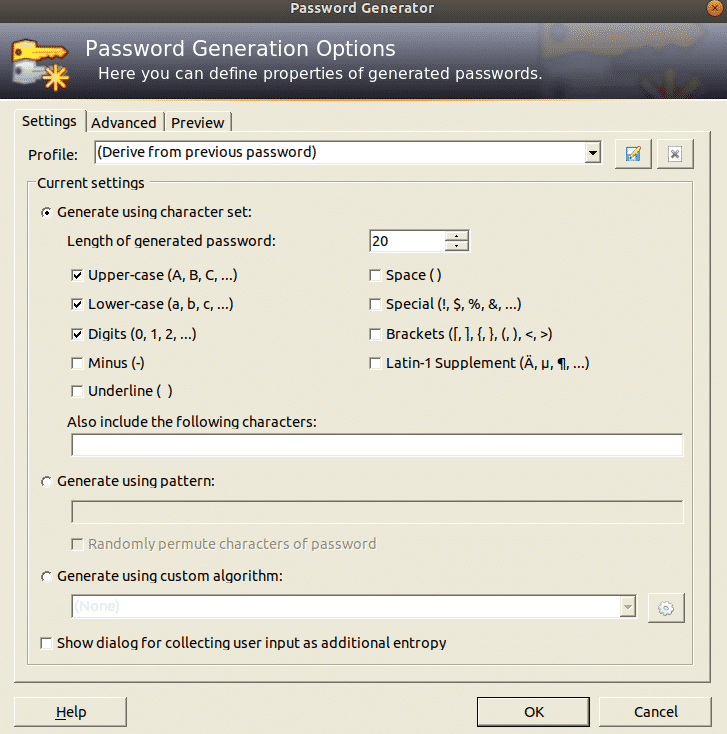
In order to generate a password,, click on the little yellow key at right most off the top of the password database.
Now a new window will open , fill in the desired fields .The title
will be the name of the website or software or whatever you want .The
user name, well that is of your own choice. The URL would be the link of
the site or to the software or whatever you typed in the title field
.None of these fields are mandatory but it helps.
By clicking the key icon, you can generate a new password. You will
get this menu, pick Open Password Generator. At that point pick the
length of your password (a length of least 25 characters is alright). At
that point pick the sorts of characters you need in your password.
Click OK and the password box will be loaded up with the password.
Click on the button to see the password. You can try Password Generator
for another spin in case you don’t like it.
Exporting Passwords from a Browser
In order to create a KeePass passwords database we have to import passwords .
Chrome’s password management system is very good. Passwords go to
password.google.com and your whole password database goes to Chrome.
This works for the vast majority, yet in case you’re hoping to escape
from Google, and proceed onward to KeePass2, here’s the place to begin
First, go to the address bar and search for “ chrome://flags/”
.Now what you have to do is to find Password Importing feature. You can do it by scrolling a whole day OR
Find it by pressing “Ctrl + F” and typing “Import ”
Turn on the “Password Import” feature .Now , find “Enable Material
Design Settings” from the list and change it to “Disabled”. It will ask
you to relaunch the browser.Relaunch it , Presently when the program
re-opens, open settings and search for
chrome://settings/passwords?search=passwords in the address bar. Now
clicking the export button will save the password database file as a CSV
file on your system .
Importing Passwords
First of all create a database as mentioned above.
Import the Password Database file by clicking on the Import button in File menu.
For importing Chrome’s password database ,click on the CSV file where you stored it.
Syncing Passwords
On the off chance that you have various PCs, the most ideal approach
to synchronize the passwords database is to introduce Dropbox. By moving
the password database file and key inside the dropbox folder, every
single change made to the passwords database (including and expelling
new passwords, and so forth) will in a split second match up across
PCs..
Utilizing KeePass in Google Chrome
The KeePass game plan works fine isolated, however in the event that
you need to solidly coordinate your local database with your program,
here’s how :
First, enter the KeePass directory:
ubuntu@ubuntu:~$ cd/usr/lib/keepass2
Inside the KeePass2 folder, make a plugins folder, and then download the HTTP plugin.
Now we just have to install a browser extension which is easily available for Chrome and Firefox.
Logging In
At the point when you need to sign into that site, right-click the
section in KeePass and pick Copy Username. Then click in the username
box on the website and CTRL + V to paste the username I. Right-click on
the entry again and do the same process with the Password box.
Conclusion:
KeePass makes creating and overseeing troublesome
passwords as simple and easy as could be. Now there is no longer any
excuse to say that maintaining unique and strong passwords is tiresome
and stressful. KeePass makes it as easy as it could be. Now you only
have to remember one Password and you can unlock the password database
with it .After reading this blog, you will be able to use KeePass
easily.
Today I’m going to show you how to setup a statefull packet
filter(nftables) with an Intrusion Prevention System (IPS/suricata). We
will be using nftables for two reasons. One being that it is the
successor to iptables/ufw and two being we can chain nftables with
suricata using priority ranking, something that iptables cannot do. We
will use suricata instead of snort. With suricata we get
multi-threading and IBM’s hyperscan to speed up the scanning of packets.
Suricata will be used in IPS mode which differs from IDS. With IPS the
packet is dropped in real time before reaching userspace using NFQUEUE.
We will be using the free rules from Emerging Threats because the paid
ones are around $700-800, and have them updated everytime we reboot.
Additionally we will send the suricata alerts in real time as desktop
notifications.
What will happen is this:
sent packet → nftables(accept/drop based on rules) →
suricata(proccessing signatures to accept or drop in real time) →
Alert(sent to desktop)
After rebooting you can check to see if the desktop notifications are
working correctly by refreshing the update manager. You should get alert
which is a policy alert that apt is being used. You can keep this on or
stop it by:
echo 'disablesid 2013504' | sudo tee -a /etc/suricata/suricata-oinkmaster.conf && sudo suricata-oinkmaster-updater
Note: If you're using TOR you may want to comment out the TOR category
in /etc/suricata/suricata.yaml and re-run suricata-oinkmaster-updater
Note: if you want to go back to UFW and you masked it, just run: sudo
unlink /etc/systemd/system/ufw.service && sudo systemctl enable
ufw.service
Note: If you want to see firewall stats just run: sudo nft list ruleset
TODO: add snort community and VRT rules... oinkmaster doesn't seem to work well with oinkcode
TODO: make a script on github
The nftables is developed by Netfilter, the same organization that currently maintains iptables. It was created as a remedy to the problems with iptables, namely scalability and performance.
Apart from a new syntax and some upgrades, you’ll find that it functions very similarly to its predecessor.
Another
justification for a new utility is that the iptables framework has
become a little convoluted with iptables, ip6tables, arptables, and
ebtables all providing different but similar functions.
For
example, it’s simply inefficient to create IPv4 rules in iptables and
IPv6 rules in ip6tables and keep the two in sync. Nftables aims to
replace all of these and be a centralized solution.
Although
nftables has been included in the Linux kernel since 2014, it’s recently
gaining more traction as adoption becomes more widespread. Change is
slow in the Linux world, and outdated utilities often take a few years
or longer to be phased out in favor of their upgraded counterparts.
Nftables
is becoming the recommended firewall of choice, and it behooves Linux
administrators to update their repertoire. Now is a great time to learn
nftables and update your existing iptables configuration.
If you
have been using iptables for years and are not too thrilled with the
idea of having to learn a brand new utility, don’t worry, we’ve got you
covered in this guide. In this article, we will cover the differences
between nftables and iptables, and show examples for configuring your
firewall rules in the new nftables syntax.
Chains and rules in nftables
In
iptables, there are three default chains: input, output, and forward.
These three “chains” (and other chains, if you have any configured) hold
“rules” and iptables works by matching network traffic to the list of
rules in a chain. If the traffic being examined doesn’t match any rule,
the chain’s default policy will be used on the traffic (i.e. ACCEPT,
DROP).
Nftables works similarly to this, with “chains” and
“rules,” as well. However, it doesn’t start out with any base chains,
which makes configuration a little more flexible.
One area of inefficiency for iptables is that all
network data had to traverse one or more of these aforementioned
chains, even if the traffic didn’t match any rules. Whether you had the
chains configured or not, iptables still checks your network data
against them.
Installing nftables on Linux
Nftables is
available in all major Linux distributions and you can easily install it
using the package manager of your distributions.
On an Ubuntu or Debian-based distribution, you can use this command:
sudo apt install nftables
To make sure that the nftables starts automatically when your system reboots:
sudo systemctl enable nftables.service
Syntax difference between iptables and nftables
Nftables
has a different and much simpler syntax than iptables. Let’s be honest,
the iptables syntax was always unclear and took some extra effort to
learn. Luckily for those migrating from iptables, nftables still accepts
the old syntax.
You can also use the iptables-translate
utility, which will accept iptables commands and convert them to the
nftables equivalent. This is an easy way to see how the two syntaxes
differ.
Install iptables-translate on Ubuntu and Debian-based distribution with this command:
sudo apt install iptables-nftables-compat
Once
it’s installed, you can pass your iptables syntax to the
iptables-translate command, and it will return the nftables equivalent
command.
Let’s see some examples so that you can see how these commands differ from each other.
Block incoming connections
This command would block incoming connections from IP address 192.168.2.1:
linux@handbook:~$ iptables-translate -A INPUT -s 192.168.2.1 -j DROP
nft add rule ip filter INPUT ip saddr 192.168.2.1 counter drop
Allow incoming SSH connections
Let’s
look at some more examples – common things that you’d normally find
yourself typing into iptables when hardening a Linux server.
linux@handbook:~$ iptables-translate -A INPUT -p tcp --dport 22 -m conntrack --ctstate NEW,ESTABLISHED -j ACCEPT
nft add rule ip filter INPUT tcp dport 22 ct state new,established counter accept
Allow incoming SSH connections from specific IP range
If you want to allow incoming SSH connections from 192.168.1.0/24:
linux@handbook:~$ iptables-translate -A INPUT -p tcp -s 192.168.1.0/24 --dport 22 -m conntrack --ctstate NEW,ESTABLISHED -j ACCEPT
nft add rule ip filter INPUT ip saddr 192.168.1.0/24 tcp dport 22 ct state new,established counter accept
To allow a certain type f traffic, here’s the syntax for both the commands:
linux@handbook:~$ iptables-translate -A INPUT -p tcp -m multiport --dports 80,443 -m conntrack --ctstate NEW,ESTABLISHED -j ACCEPT
nft add rule ip filter INPUT ip protocol tcp tcp dport { 80,443} ct state new,established counter accept
As
you can see from these examples, the syntax is still pretty similar to
iptables, but the commands are a little more intuitive.
Logging with nftables
The
“counter” option present in the nft command examples above tells
nftables to count the number of times a rule is touched, like iptables
used to do by default.
In nftables, they are optional and must be specified.
nft add rule ip filter INPUT ip saddr 192.168.2.1 counter accept
Nftables has options built in for exporting your configuration. It currently supports XML and JSON.
nft export xml
Conclusion
In
this article, I explained why nftables is the new recommended choice
when it comes to Linux firewalls. I have also listed a lot of the
differences between the old iptables and the newer nftables, including
their functionality and syntax.
This guide has shown you why to
consider upgrading to nftables, and how to get started with the new
syntax you will need to familiarize yourself with in order to
successfully upgrade your old iptables rules.


![[OpenBSD 6.9]](https://www.openbsd.org/images/puffy69.jpg)